I’ve written about growing your Facebook Likes many times before. I wrote about it here and here and here and here and here and here.
That’s a lot!
So I considered not writing this post and adding to the noise. But I had to do it because what I am going to provide you today is unique and valuable. And — hey — everyone wants to know how to get more Facebook Likes!
The posts I’ve written before about getting Facebook Likes are certainly helpful. Those posts provide a list of ads and strategies you can use. But never before have I offered a process.
It’s taken some time, but I have adopted a process that I now use for myself and for clients to quickly and efficiently build a highly relevant Fan base without breaking the bank.
No, this is not about cheap Likes in strange countries. It’s not about shady services. It’s about implementing a process to strategically target people who will flock to your Facebook Page.
It’s a seven step process. Let’s go…
First, run a Graph Search like this:
Pages liked by people who like Jon Loomer Digital and Mari Smith.
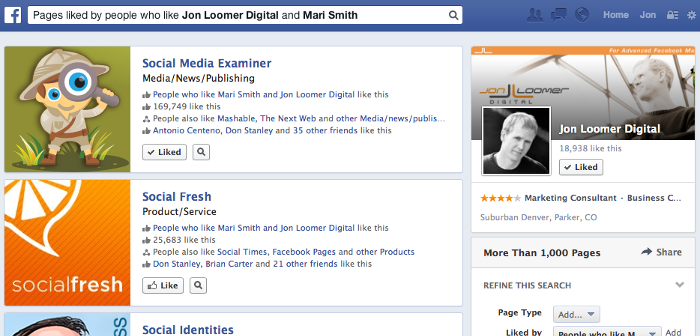
I picked the biggest name I could think of to pair my Page with. I want to know the overlap.
I write down all of the Pages that appear on the first page of results. And then I run the process over and over again.
Then I run a Graph Search like this:
Favorite Interests of people who like Jon Loomer Digital and Mari Smith.
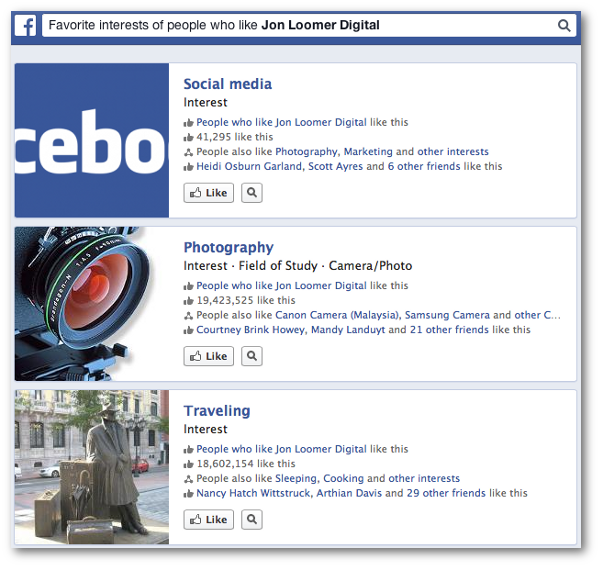
I again run this process repeatedly. This time, though, I make sure to filter out anything that is too broad and clearly not relevant (like Traveling).
 Notice that I did not include any hashtag interests to make it
broader. I don’t want to target people who like something related to
these Pages and interests (which is what happens when you use the
hashtag), I want these Pages and interests only.
Notice that I did not include any hashtag interests to make it
broader. I don’t want to target people who like something related to
these Pages and interests (which is what happens when you use the
hashtag), I want these Pages and interests only.
I keep country, gender and age targeting very broad…
You could target only English speaking people at this point, too. I’ve chosen not to.
This Saved Audience is created. Hang onto it, we’ll use it later.
I fact, I’m not going to include Custom Audiences in this list at all because my intention is to find completely new people who were not previously exposed to your brand.
You’ve hopefully already created a Custom Audience. This involves uploading your email list (or other customer list) into Power Editor so that you can target ads at these people, regardless of whether they are Fans (powerful stuff!).
But I’d neglected Lookalike Audiences until recently. I wasn’t seeing great results. And I recently realized why.
Previously when I created Lookalike Audiences, I was adding targeting to make it far too fine. I wasn’t trusting Facebook’s algorithm that already determined that these users were similar to my customers. As a result, the audience was small and ineffective.
I learned from that, and you’ll learn from my mistakes.
To create a Lookalike Audience, highlight your Custom Audience in Power Editor and click the “Create Similar Audience” button.
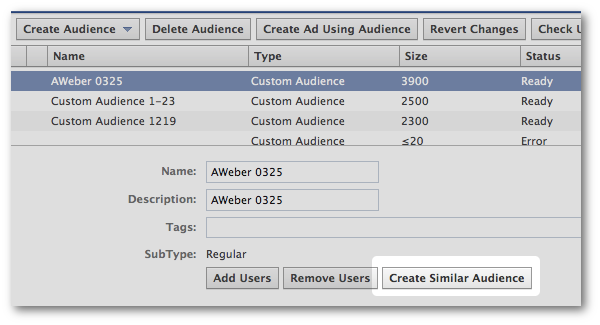
Then have Facebook create a Lookalike Audience based on similarity (the top 1% of users similar to your Custom Audience).

Do this for every country that fits your broader audience. Again, I used my top six countries.
Once again, put this aside.
Create one ad within each with very broad settings. Here’s what I did…
Now run these Sponsored Stories at a budget high enough or a period long enough to learn from the results. We’ll get to that later.
This is the excruciatingly simple ad that I created:
If they click on the ad instead of immediately liking, they are directed to my Facebook tab where they are instructed to like my Page to get free access to the eBook.
Feel free to do something similar. Think of something you can create of value that you can give away in exchange for liking your Page.
By the way, I use ShortStack (aff.) to create these like gated tabs.
Reminder: Create separate campaigns, one for your Lookalike Audiences and one for the similar Pages and Interests. And don’t forget to keep the targeting broad!
If you haven’t yet started using the new Facebook advertising reports, you need to start now. It’s an absolutely amazing tool that can make your advertising a whole lot easier (and save you money in the process!).
Now you should create three reports that help you quickly see what is working. All three reports should filter out the campaigns that you just created. The difference is what you select in the Data Breakdowns setting.
Since you can only select one of these options for each report, you’ll need to create three:
But I also realized that I was spending too much for certain groups and in certain placements. These are things that are now very easy to determine within the new ad reports.
So, what do you do with this information? You stop the original ads and create new, optimized ads that focus on the areas that are working.
That’s a lot!
So I considered not writing this post and adding to the noise. But I had to do it because what I am going to provide you today is unique and valuable. And — hey — everyone wants to know how to get more Facebook Likes!
The posts I’ve written before about getting Facebook Likes are certainly helpful. Those posts provide a list of ads and strategies you can use. But never before have I offered a process.
It’s taken some time, but I have adopted a process that I now use for myself and for clients to quickly and efficiently build a highly relevant Fan base without breaking the bank.
No, this is not about cheap Likes in strange countries. It’s not about shady services. It’s about implementing a process to strategically target people who will flock to your Facebook Page.
It’s a seven step process. Let’s go…
1. Use Graph Search to Isolate Precise Interests
I’ve spoken before about how to use Graph Search to learn more about your Facebook Fans. But I’ve been amazed by how well this works.First, run a Graph Search like this:
Pages liked by people who like Jon Loomer Digital and Mari Smith.
I picked the biggest name I could think of to pair my Page with. I want to know the overlap.
I write down all of the Pages that appear on the first page of results. And then I run the process over and over again.
Then I run a Graph Search like this:
Favorite Interests of people who like Jon Loomer Digital and Mari Smith.
I again run this process repeatedly. This time, though, I make sure to filter out anything that is too broad and clearly not relevant (like Traveling).
2. Create a Saved Audience in Power Editor
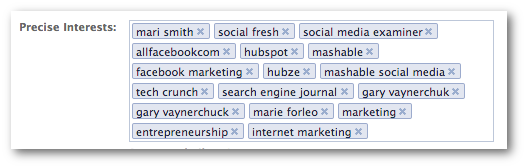
Then I go into Power Editor and create a Saved Audience. I add the Pages and interests that made the cut.I keep country, gender and age targeting very broad…
- Age: 20 and Over
- Gender: Men and Women
- Country: United States, United Kingdom, Canada, Australia, Portugal and Brazil
You could target only English speaking people at this point, too. I’ve chosen not to.
This Saved Audience is created. Hang onto it, we’ll use it later.
3. Create a Lookalike Audience
Normally I would list creating a Custom Audience first — I love Custom Audiences — but I’m going backwards here because I want to focus first on a completely different audience.I fact, I’m not going to include Custom Audiences in this list at all because my intention is to find completely new people who were not previously exposed to your brand.
You’ve hopefully already created a Custom Audience. This involves uploading your email list (or other customer list) into Power Editor so that you can target ads at these people, regardless of whether they are Fans (powerful stuff!).
But I’d neglected Lookalike Audiences until recently. I wasn’t seeing great results. And I recently realized why.
Previously when I created Lookalike Audiences, I was adding targeting to make it far too fine. I wasn’t trusting Facebook’s algorithm that already determined that these users were similar to my customers. As a result, the audience was small and ineffective.
I learned from that, and you’ll learn from my mistakes.
To create a Lookalike Audience, highlight your Custom Audience in Power Editor and click the “Create Similar Audience” button.
Then have Facebook create a Lookalike Audience based on similarity (the top 1% of users similar to your Custom Audience).
Do this for every country that fits your broader audience. Again, I used my top six countries.
Once again, put this aside.
4. Create Page Like Sponsored Stories
Create two different campaigns in Power Editor:- Page Like Sponsored Story – Similar Pages and Interests
- Page Like Sponsored Story – Lookalike Audiences
Create one ad within each with very broad settings. Here’s what I did…
- Placement: All Facebook
- Country: United States, United Kingdom, Canada, Australia, Portugal, Brazil
- Age: 20+
- Gender: All
- Connections: Users who are not already connected to Jon Loomer Digital
Now run these Sponsored Stories at a budget high enough or a period long enough to learn from the results. We’ll get to that later.
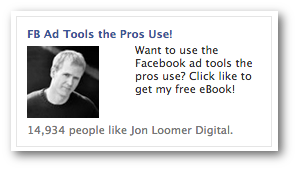
5. Create a Like Gated Offer
Now create a standard Facebook ad that attracts the same audiences as in the previous step. This time, you’ll use something of value as bait.This is the excruciatingly simple ad that I created:
If they click on the ad instead of immediately liking, they are directed to my Facebook tab where they are instructed to like my Page to get free access to the eBook.
Feel free to do something similar. Think of something you can create of value that you can give away in exchange for liking your Page.
By the way, I use ShortStack (aff.) to create these like gated tabs.
Reminder: Create separate campaigns, one for your Lookalike Audiences and one for the similar Pages and Interests. And don’t forget to keep the targeting broad!
6. Use Facebook Ad Reports to Optimize
Now it’s time to optimize!If you haven’t yet started using the new Facebook advertising reports, you need to start now. It’s an absolutely amazing tool that can make your advertising a whole lot easier (and save you money in the process!).
Now you should create three reports that help you quickly see what is working. All three reports should filter out the campaigns that you just created. The difference is what you select in the Data Breakdowns setting.
Since you can only select one of these options for each report, you’ll need to create three:
- Age & Gender
- Country
- Placement
- Data Aggregation: Campaign and Ad
- Delivery & Spend: Frequency and Spend
- Clicks: Nothing
- Actions: Page Likes
- Cost per Action: Cost per Page Like
But I also realized that I was spending too much for certain groups and in certain placements. These are things that are now very easy to determine within the new ad reports.
So, what do you do with this information? You stop the original ads and create new, optimized ads that focus on the areas that are working.